TX-FLEX quick guide
for the digital delivery of load documents to Dispatch
PostNord, Denmark’s national postal service, stopped handling letter mail at the end of 2025.
This change directly affects how delivery documents, load paperwork and other operational documents are transferred between the truck and the main office. For this reason, the document handover procedure has been changed.
What changes in practice
- Trip documents must be sent primarily in digital form during operations, using the Transics companion app TX-FLEX, at the step where loading activities are recorded in the trip planning flow.
NOTE: This change does not apply to vehicles equipped with dedicated mobile scanners connected to the Transics system, which will continue to be used according to the existing procedure. - Printed load documents must still be handed in weekly, organised in an envelope as before. When needed, the envelope can be handed to a trusted colleague who will reach Taulov or Grønbjerg. An internal collection box for printed load documents is available at the Taulov operational base for handing in physical documents.
NOTE: The document box at the offices in Grønbjerg remains the preferred drop-off point for drivers who regularly reach headquarters. - Sending printed load documents by post is no longer allowed. If, for operational reasons, a driver cannot reach Taulov or Grønbjerg for up to three weeks, Dispatch must be contacted to agree an alternative delivery method for the documents.
- Documents containing privileged or confidential information, including personal data (for example timesheets, payslips or similar documents), must be delivered in person to the Grønbjerg office. These documents must not be handed to other colleagues, must not be deposited in Taulov, and must not be placed in any other internal post boxes — not even in a sealed envelope.
- installing and setting up the companion app TX-FLEX,
- capturing load documents and sending them correctly during operations.
Step 1
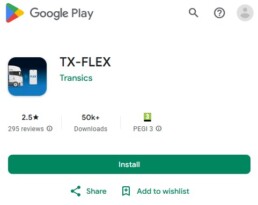
Download TX-FLEX on the truck phone
Open Google Play on the Android phone (the icon with the coloured triangle). In the search field at the top, type TX-FLEX and run the search. From the results, select the TX-FLEX app by Transics. Tap Install and wait until installation completes. Then tap Open. On first launch, the phone will ask for permissions for camera, files and location; these must be accepted for the app to work correctly.
Step 2
Display the QR code on the Transics unit (TX-SKY)
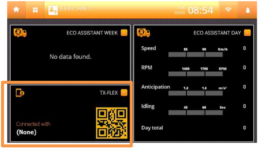
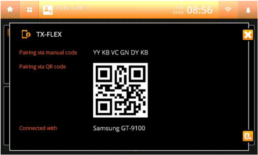
On the Transics unit in the truck, swipe left on the main screen until you reach the third dashboard screen (the one with ECO data). After an update, one of the panels is now dedicated to TX-FLEX. In this panel you will see the QR code required to pair the TX-FLEX app with the truck’s TX-SKY terminal.
If the QR code is difficult to read (often with older smartphones), tap the “+” icon in the top-right corner of the TX-FLEX panel. This will:
- show the QR code full screen,
- also show a numeric code that can be used for manual pairing if the automatic scan fails repeatedly.
Step 3
Pair the TX-FLEX app with the TX-SKY unit
Once the QR code is displayed on the TX-SKY screen, open TX-FLEX on the phone.
- Make sure Bluetooth is enabled, then open the pairing/connection menu in TX-FLEX. The phone camera will open automatically.
- Point the phone at the Transics screen and scan the QR code. No other buttons are needed; scanning is automatic. If required, move the phone closer or further away until the image is sharp and the full QR code is visible in the camera view.
- If scanning fails after several attempts, use the numeric code shown on TX-SKY and enter it manually in TX-FLEX.
After successful pairing, the truck’s registration number will be shown at the bottom of the app home screen, along with the name of the driver whose card is inserted in the tachograph.
Step 4
Continue in TX-SKY, then switch document capture to TX-FLEX
Use TX-SKY exactly as before in the Planning module. The only difference is during the loading activity:
- When you reach the loading activity in Planning, at step 4 you will be asked about document scanning.
- From now on, answer “YES” to document scanning (instead of “NO” as before).
- The system will detect that TX-FLEX is connected to TX-SKY and will display a message telling you to continue on the phone app.
- Open TX-FLEX on the phone and go to “At work” > “Plannings” > “Loading”.
Step 5
Photograph (scan) the documents
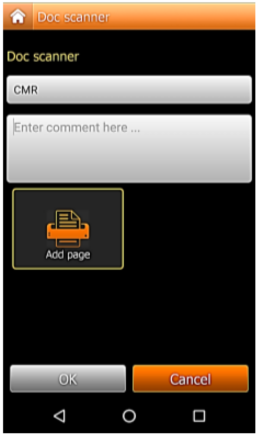
After the loading activity has been started in TX-SKY, TX-FLEX recognises this automatically. In TX-FLEX, open “Plannings”; the Edit option for the loading sub-function becomes active.
- Tap “Edit”. A document capture screen (CMR) opens, with the option “Add page”.
- Tap “Add page” to start the camera (or CamScan if installed).
- Place the document on a flat surface with good lighting. Point the camera at the document and capture all corners in the frame, without tilting the phone or forcing perspective distortion.
- Confirm the capture (if readable) and repeat for multi-page documents. We photograph the transport documents for the products, without CMR or certificates of conformity.
- When all required photos have been added, tap “OK” to confirm upload. The app returns to the previous screen. The documents are attached to the trip and transferred to the office without any further action.
- Return to the TX-SKY terminal and complete loading as usual.
Optional
Use of CamScanner (recommended)
TX-FLEX can automatically use CamScanner if it is installed on the phone.
Benefits of CamScanner:
- automatic edge detection and cropping,
- better readability (brightness, contrast),
- clearer results, especially in poor light,
- lower risk of documents being rejected due to low quality.
No additional setup is needed: if the app is installed, TX-FLEX will use it automatically for capture.